Authentication
Authentication to the Superfacility API is handled by submitting an OAuth access token (JWT) with your API call.
Create a Superfacility API Client in Iris
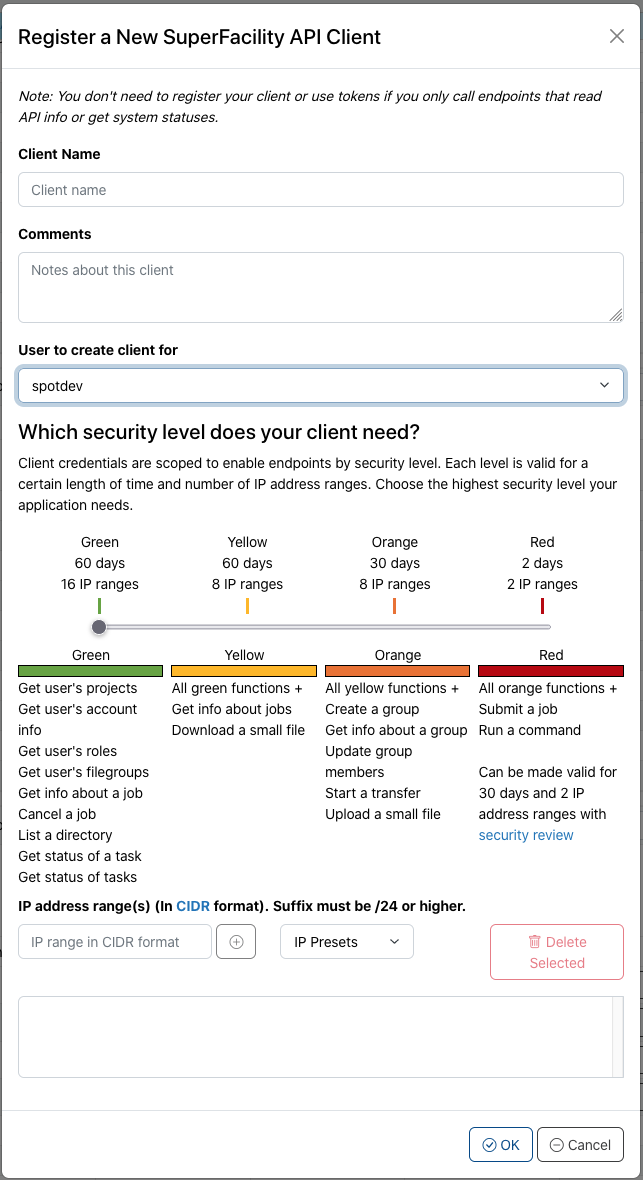
In order to create access tokens, you first need to create an OAuth client. This can be done on the Iris profile page in the "Superfacility API Clients" section. Clicking the "+ New Client" button in this section will bring up a window like this:
A Superfacility API Client can be used to generate access tokens until it is deleted or until it expires. A client can be created for your user account or for any collab accounts to which you have access.
Client security level
As of Feb 9 2023, you need to select the security level ("color") of your client with the slider in the UI. The more capabilities your client offers the shorter is its lifetime and the smaller is the number of source IP ranges you can use the API from. For example, a red client allows you to use the full range of endpoints including running an arbitrary command or submitting a job but it will restrict the source IP ranges to just 2 and the client expires after 48 hours. A green client will live for 60 days and allows you to add a large number of source IP ranges (ideal for lab-wide deployments) while it restricts the use of API endpoints to just those that don't pose a huge threat in case your client credentials become compromised. The security level of all endpoints is stored in the x-nersc-scope field which you can find by clicking on an API endpoint at https://api.nersc.gov/api/v1.2.
Client lifetime
We currently offer client lifetimes of 60, 30, and 2 days depending on the security level of your client. The red client is the only client that will allow you to run arbitrary commands or submit jobs. As these are the capabilities that pose the highest threat in case of a compromised credential, the lifetime of a red client is reduced to just two days. We understand that this makes it difficult to deploy an app or workflow tool that aims to run jobs on our systems in an automated fashion. Hence, we allow for red clients with a lifetime of 30 days if your workflow/app passes a security review. The idea is that you develop your app with regular red clients first. Once your app reaches maturity you can reach out to us and have your deployment reviewed to get access to longer-lived red clients.
Client Source IP Range
Each client must have at least one source IP range specified. You can enter an IP range in the free-form text field, or you can choose one of the available "IP Presets". Information on these presets is listed in the table below.
| IP Preset | Information |
|---|---|
| Your IP | This inserts the IP address of the computer on which you are creating the client. Choose this option if you plan to use the SF API from your computer. |
| Spin | This fills in the IP address range corresponding to the Spin system at NERSC. Use this option if you are creating a client to use with a Spin service. |
| DTN Nodes | This inserts the IP address range of the NERSC Data Transfer Nodes. Use this option if you are planning to make SF API calls from a DTN. |
| Perlmutter Login Nodes | This inserts the IP address range of the login nodes on the Perlmutter system. Choose this option if you are planning to make SF API calls from Perlmutter login nodes, including from Jupyter servers there. |
The security level of your client determines the amount of source IP ranges that you can add.
Save the client information
Once you have filled out the new client form, you will receive a private/public key-pair and a client ID. It is important to save the private key in a secure location, as you will not be able to view it again in Iris. Treat the client's private key with the same care as any login credential, e.g. an ssh key. When keeping the key in a multi-tenant environment make sure the permissions are set to 400 (or r--------, i.e. only your user account can read it). On Spin, it is acceptable to store the key as a secret.
Exchange a "client assertion" for an "access token"
Next you need to use your private key to generate a client assertion that can be exchanged for an access token. Access tokens have short lifetimes of approximately 10 minutes.
There are two ways to use your client key to generate an access token:
- The recommended way is to use a software library.
- Alternatively, you can use standard tools on the command line. (This is useful for quick tests.)
Using the AuthLib Python Library to get an Access Token
There are libraries for most programming languages that allow you to generate and use an access token from the client information shown in Iris. In this example, we will use the Authlib Python library.
After installing the Authlib library via either conda or pip, we can then use it to generate an access token from the key pair and client ID created in Iris:
from authlib.integrations.requests_client import OAuth2Session
from authlib.oauth2.rfc7523 import PrivateKeyJWT

token_url = "https://oidc.nersc.gov/c2id/token"
client_id = "<your client id>"
private_key = "<your private key>"

session = OAuth2Session(
    client_id,
    private_key,
    PrivateKeyJWT(token_url),
    grant_type="client_credentials",
    token_endpoint=token_url
)
session.fetch_token()
Further information about the OAuth2Session is available in the Authlib documentation. An OAuth2Session object implements "OAuth for Requests," a replacement for the requests-oauthlib library. You can use it just like a Requests Session object (in fact it is derived from that). In constructing session above we have given it all the metadata it needs to automatically update the token if it expires. This way, you don't have to manually request a new token when the old one expires.
Using the command line to get an Access Token
Here, we show how to use the command line and some standard tools (curl, openssl, etc) to create a client assertion and exchange it for an access token.
1. Save the client id to a json file
First, create a json file called payload.json:
{
        "iss" : "<client_id>",
        "sub" : "<client_id>",
        "aud" : "https://oidc.nersc.gov/c2id/token",
        "exp" : <expiration timestamp>
}
"client_id" is your client id from Iris.
The expiration timestamp should be in the future. You can get a future date (eg. 5 mins from now) from the GNU date command:
date --date 'now + 5 minutes' "+%s"
or from BSD date:
date -v +5M "+%s"
2a. Create the client assertion using the "jose" tool
Next we need to create a client assertion (a JWT), by taking the payload.json file, adding a header and signing it with our private key. The simple way to do this is to install the jose tool, and run:
ASSERTION=$(jose jws sig -I payload.json -k my-keyset.jwk -c)
Here, my-keyset.jwk is private key in JWK format as shown by Iris.
2b. Or, create the client assertion using standard tools
Alternatively, you can create the client assertion using standard tools. Iris shows the generated client keys in both JWK and PEM formats. Using the latter, you can construct a JWT using openssl. Save the PEM-formatted private key as priv_key.pem and run:
echo -n '{ "alg": "RS256" }' | openssl base64 -A | tr '/+' '_-' | tr -d '=' > head.b64
openssl base64 -in payload.json -A | tr '/+' '_-' | tr -d '=' > body.b64
cat head.b64 <(echo '.') body.b64 | tr -d "\n" > jwt.txt
openssl dgst -sha256 -sign priv_key.pem jwt.txt | openssl base64 -A | tr '/+' '_-' | tr -d '=' > sig.sha256.b64
ASSERTION=`cat jwt.txt <(echo '.') sig.sha256.b64 | tr -d "\n"`
The tr command trailing the openssl lines translates base64 to the base64url encoding that JWTs use.
3. Exchange the client assertion for an access token
Now you're ready to exchange the encrypted assertion for a short-lived access token:
curl -s -XPOST -H "Content-Type:application/x-www-form-urlencoded" -d "grant_type=client_credentials&client_assertion_type=urn%3Aietf%3Aparams%3Aoauth%3Aclient-assertion-type%3Ajwt-bearer&client_assertion=$ASSERTION" https://oidc.nersc.gov/c2id/token
The returned json will contain the access token under the "access_token" key.
Call the SuperFacility API with the access token
Once you have the access token, you can call the API:
From bash:
curl -X POST "https://api.nersc.gov/api/v1.2/utilities/command/dtn01" -H "accept: application/json" -H "Authorization: $ACCESS_TOKEN" -H "Content-Type: application/x-www-form-urlencoded" -d "executable=hostname"
From Python, using the requests library:
import requests
access_token='<your access token goes here>'
r = requests.get("https://api.nersc.gov/api/v1.2/tasks?tags=%20", headers={ "accept": "application/json", "Authorization": access_token})
print(r.json())
Note
Make sure to check out the examples.