Globus
Overview
Globus is the recommended way to move significant amounts of data between NERSC and other sites. Globus addresses many of the common challenges faced by researchers in moving, sharing, and archiving large volumes of data. With Globus, you hand-off data movement tasks to a hosted service that manages the entire operation, monitoring performance and errors, retrying failed transfers, correcting problems automatically whenever possible, and reporting status to keep you informed while you focus on your research. Visit Globus.org for documentation on its easy to use web interface and its versatile REST/API for building scripted tasks and operations.
Availability
Globus is available as a free service that any user can access. You can log in to Globus web interface with your NERSC credentials (by selecting NERSC in the drop down menu of supported identity providers) or using many of the other supported providers listed that you can authenticate against. NERSC maintains several Globus endpoints that can be activated for individual use by any NERSC user. The list of endpoints are provided in the table below.
| Endpoint Name | Description | Recommended Use |
|---|---|---|
| NERSC DTN | Multi-node, high performance transfer system with access to all NERSC File Systems (CFS, homes, common, Perlmutter scratch) but not HPSS | All data transfers needs into & out of NERSC |
| NERSC Perlmutter | Multi-node system with access to all NERSC File Systems (CFS, homes, common, Perlmutter scratch) but not HPSS | If NERSC DTN is unavailable |
| NERSC HPSS | Single node system connected directly to the NERSC HPSS tape archive | Remote transfers into & out of HPSS |
| NERSC SHARE | Single node system with read-only access to some NERSC file systems | Shared Globus endpoint |
| NERSC S3 | Single node system for accessing data on Amazon S3 | Data transfers to / from your Amazon S3 bucket |
Setting up a Personal Globus Endpoint
Even when there is not an official endpoint available it can still be useful to have access to the retry and notification features of Globus. You can do this using Globus Connect Personal to configure an endpoint on your personal device. In general it is always fastest to use the official NERSC endpoints, but this can be useful for transfers to / from a local laptop or computer.
You can find instrctions for downloading and installing the Globus Connect Personal on the Globus web site.
Tip
You may get a "Permission Denied" error for certain paths with Globus Connect Personal. If you do, you may need to add this path to your list of allowed paths for Globus Connect Personal. You can do this by editing the ~/.globusonline/lta/config-paths file and adding the path to the end of the list. The path must be followed by sharing (0/1) and R/W (0/1) flags.
e.g. /pscratch/sd/<user_initial\>/<username\>/,0,1
Globus Transfers and the HPSS Tape Archive
Two-Stage Transfers for HPSS and Globus Recommended For Large Transfers
Due to a bug in the Globus interface, Globus HPSS transfers that involve a large number of files will be very slow. Instead we recommend you use the two-stage transfer process described below.
Because of pecularities of the Globus-HPSS interface, Globus is sometimes not the best tool to use for transfers to or from the HPSS Tape Archive. For instance, Globus transfers involving HPSS cannot resume interrupted transfers so each minor network interruption means starting again from the beginning of the transfer. It also cannot split transfers into multiple streams (a powerful tool for increasing transfer speed) for transfers involving HPSS.
If you are doing large data transfers between HPSS and a NERSC file system (like CFS or scratch), we recommend that you use the dedicated HPSS transfer tools like hsi and htar. This will be the fastest way to move your data.
Additionally, if you are finding that your external transfers to / from HPSS are frequently interrupted, it may be faster to do a "two-stage" transfer where data is transferred to CFS or scratch using the NERSC DTN endpoint and then put into the HPSS Tape Archive using hsi and htar (and reversing these steps for extracting data from HPSS).
Sharing Data with Globus
Guest Collections
Data at NERSC can be shared externally using Guest Collections (formerly known as Globus Sharing). Currently Guest Collections at NERSC are read-only; no writing is allowed. Sharing is limited to /global/cfs/cdirs/<your_project_name>/gsharing and subdirectories (and the DnA file system for JGI users).
To share data, create a gsharing directory in your project's directory on the Community File System. Then open a ticket and let us know the directory path you'd like to share (we currently have to manually update the configuration file to allow directories to be shared).
Once you hear back from us, go to the NERSC Share Globus endpoint web page. Click on the "Collections" tab and select "Add a Guest Collection". This will bring you to a screen where you can give your shared endpoint a name and fill in the path you'd like to share. Most people choose to create a subdirectory in the gsharing directory and share that. If you had multiple collections of data you wanted to share with different sets of people, you could create different subdirectories and share them as separate endpoints.
Click on the "Create Share" button and it will take you to another screen where you can share this endpoint with specific Globus users or with all Globus users (these users do not have to be NERSC users). You can also make other Globus users administrators, which will mean that they will have the power to add or remove other users from the shared endpoint.
Warning
If your files and directories are set to be world readable, they can be shared by any NERSC user if you opt into Globus Sharing. We recommend you set the permissions on your files and directories to be only user and group readable to avoid accidental sharing.
chmod -R o-rwx /global/cfs/cdirs/<your_project_name>/gsharing
Globus and Collaboration Accounts
Collaboration Accounts are designed to facilitate collaborative computing by allowing multiple users to use the same account. At the request of the PI or PI Proxy, NERSC can set up a dedicated Globus endpoint that will allow data transfers via Globus as the collaboration account. This is a valuable tool for groups that need to make large data transfers into or out of NERSC and would like the data to be owned by the collaboration account. Only NERSC users who could already become the collaboration account and have linked their Globus account to their NERSC account are able to access these endpoints. If you are interested in this, please open a ticket and we'll work with you to set one up.
Checking If Your Globus Account is Linked to Your NERSC Account
You can use the Globus CLI to check if your NERSC account is linked to your Globus account. At NERSC you can do this via
module load globus-tools
globus get-identities <nersc_user_name>@nersc.gov
If the account is linked it will return a long UUID. If it's not, it will return NO_SUCH_IDENTITY. If you need to link your account, follow the Globus Account Link Instructions.
Command Line Globus Transfers at NERSC
Globus provides a Python-based SDK (Software Development Kit) for doing data transfers, managing endpoints, etc. You can access this at NERSC by loading the globus-tools module (module load globus-tools). NERSC has written several scripts using the Globus SDK to help with command line data transfers. These scripts use Globus Applications and tokens to manage authorization and access.
Note that the globus-tools module also loads a Python module, so you should not mix this module with a conda init-based setup. A workaround is to install the globus-sdk library in a custom conda environment via conda install -c conda-forge globus-sdk.
Transferring Files
You can use this script for internal transfers between NERSC file systems or for external transfers between two Globus endpoints provided you have the endpoint's UUID (which can be looked up on Globus' Endpoint Page). This script also understands "hpss" (the NERSC HPSS Endpoint), "dtn" (the NERSC DTN Endpoint), or "perlmutter" (the NERSC Perlmutter Endpoint), so you won't need to look up the UUIDs for those endpoints.
Usage is:
nersc> module load globus-tools
nersc> transfer_files.py -h
transfer_files.py: error: the following arguments are required: -s, -t, -d, -i
Globus transfer helper

Required arguments:
  -s SOURCE       source endpoint UUID
  -t TARGET       target endpoint UUID
  -d OUT_DIR      target endpoint output directory
  -i INFILES      file containing list of full path of input files

Optional arguments:
  -p, --preserve  Preserve time stamps
Tip
If you are using Globus to read a large number (>100) of files from NERSC's HPSS Archive, please use this script. It will ensure that the files are read off in in tape order, and will reduce tape wear and overall transfer time.
Checking the Status of Transfers
You can use this script to check on the status of your transfers. If you call it with no arguments it will show you the status of your last 10 Globus transfers. You can also invoke it with a transfer UUID to see just a single transfer or with the -p flag to get easily parsable output. If a transfer fails, you can use the -d option to see the reason.
Usage is:
nersc> check_transfers.py --help
usage: check_transfers.py [-h] [-i IDS] [-n NUMBER] [-d] [-p]

Globus transfer lister

optional arguments:
  -h, --help            show this help message and exit
  -i IDS, --id IDS      Transfer ID or comma separated list of transfer IDs to
                        lookup
  -n NUMBER, --number NUMBER
                        Number of transfer records to retrieve
  -d, --details         Get details on individual transfers
  -p, --parsable        Get easy to parse output: Transfer ID | Status
Generate a Globus Token for Use at NERSC
If you'd just like to generate a Globus token, you can use our helper script generate_token.py (no arguments required) and follow the prompts. See the token section for a discussion of token security.
Limitations
Globus imposes several limitations to transfers such as limits on the number of total files, number of pending transfers, etc. You can view their current limits on their FAQ page.
Examples
Transfer files from NERSC's Community file system to NERSC's Perlmutter Scratch file system
Tip
This can be used to stage data on Perlmutter scratch before using it in a running job. See the script stage_data.script (included in the globus-tools module) for an example of how to do this.
First, generate a list of files and directories you wish to transfer. If a directory is included in this list, its contents will be recursively transferred to the target directory.
ls /global/cfs/cdirs/<myrepo>/<my_dataset_directory> > transfer.txt
ls /global/cfs/cdirs/<myrepo>/<my_other_dataset_directory>/data01.dat >> transfer.txt
Then invoke the transfer script
module load globus-tools
transfer_files.py -s dtn -t perlmutter -d /pscratch/sd/<letter>/<your_username>/input_directory -i transfer.txt
If this is the first time running the script, you'll see the next two lines, followed by the standard transfer information:
Please go to this URL and login: https://auth.globus.org/v2/oauth2/authorize?client_id=<super_mega_long_string_here>
Please enter the code you get after login here: <snipped>
Transfer ID is b'XXXXXXXX-XXXX-XXXX-XXXX-XXXXXXXXXXXX' label is <username>_<datestamp>
You can check on the status of the transfer with the check_transfer.py script
nersc> module load globus-tools
nersc> check_transfer.py -i XXXXXXXX-XXXX-XXXX-XXXX-XXXXXXXXXXXX
Task(XXXXXXXX-XXXX-XXXX-XXXX-XXXXXXXXXXXX):
  label: <your_user_name>_2019-11-21_12_21_17, start: 2019-11-21 20:21:18+00:00, done:2019-11-21 20:21:23+00:00
  nersc#dtn -> nersc#dtn SUCCEEDED
Get more easily parsed status updates by adding the -p flag
nersc> module load globus-tools
nersc> check_transfer.py -i XXXXXXXX-XXXX-XXXX-XXXX-XXXXXXXXXXXX -p
XXXXXXXX-XXXX-XXXX-XXXX-XXXXXXXXXXXX | SUCCEEDED
Transfer files from NERSC's HPSS Archive to another location
It's important to order your retrievals when reading from HPSS. These command line tools will do this automatically for you.
First, generate a list of files you'd like to transfer:
nersc> hsi -q ls -1 -R name_of_hpss_directory_or_file 2> gtransfer_list.txt
Then invoke the transfer script
nersc> transfer_files.py -s hpss -t <target_endpoint_UUID> -d /your/destination/path -i gtransfer_list.txt
(if this is the first time running the script, you'll see the next two lines)
Please go to this URL and login: https://auth.globus.org/v2/oauth2/authorize?client_id=<super_mega_long_string_here>
Please enter the code you get after login here: <snipped>
Transfer ID is b'XXXXXXXX-XXXX-XXXX-XXXX-XXXXXXXXXXXX' label is <username>_<datestamp>
Tokens
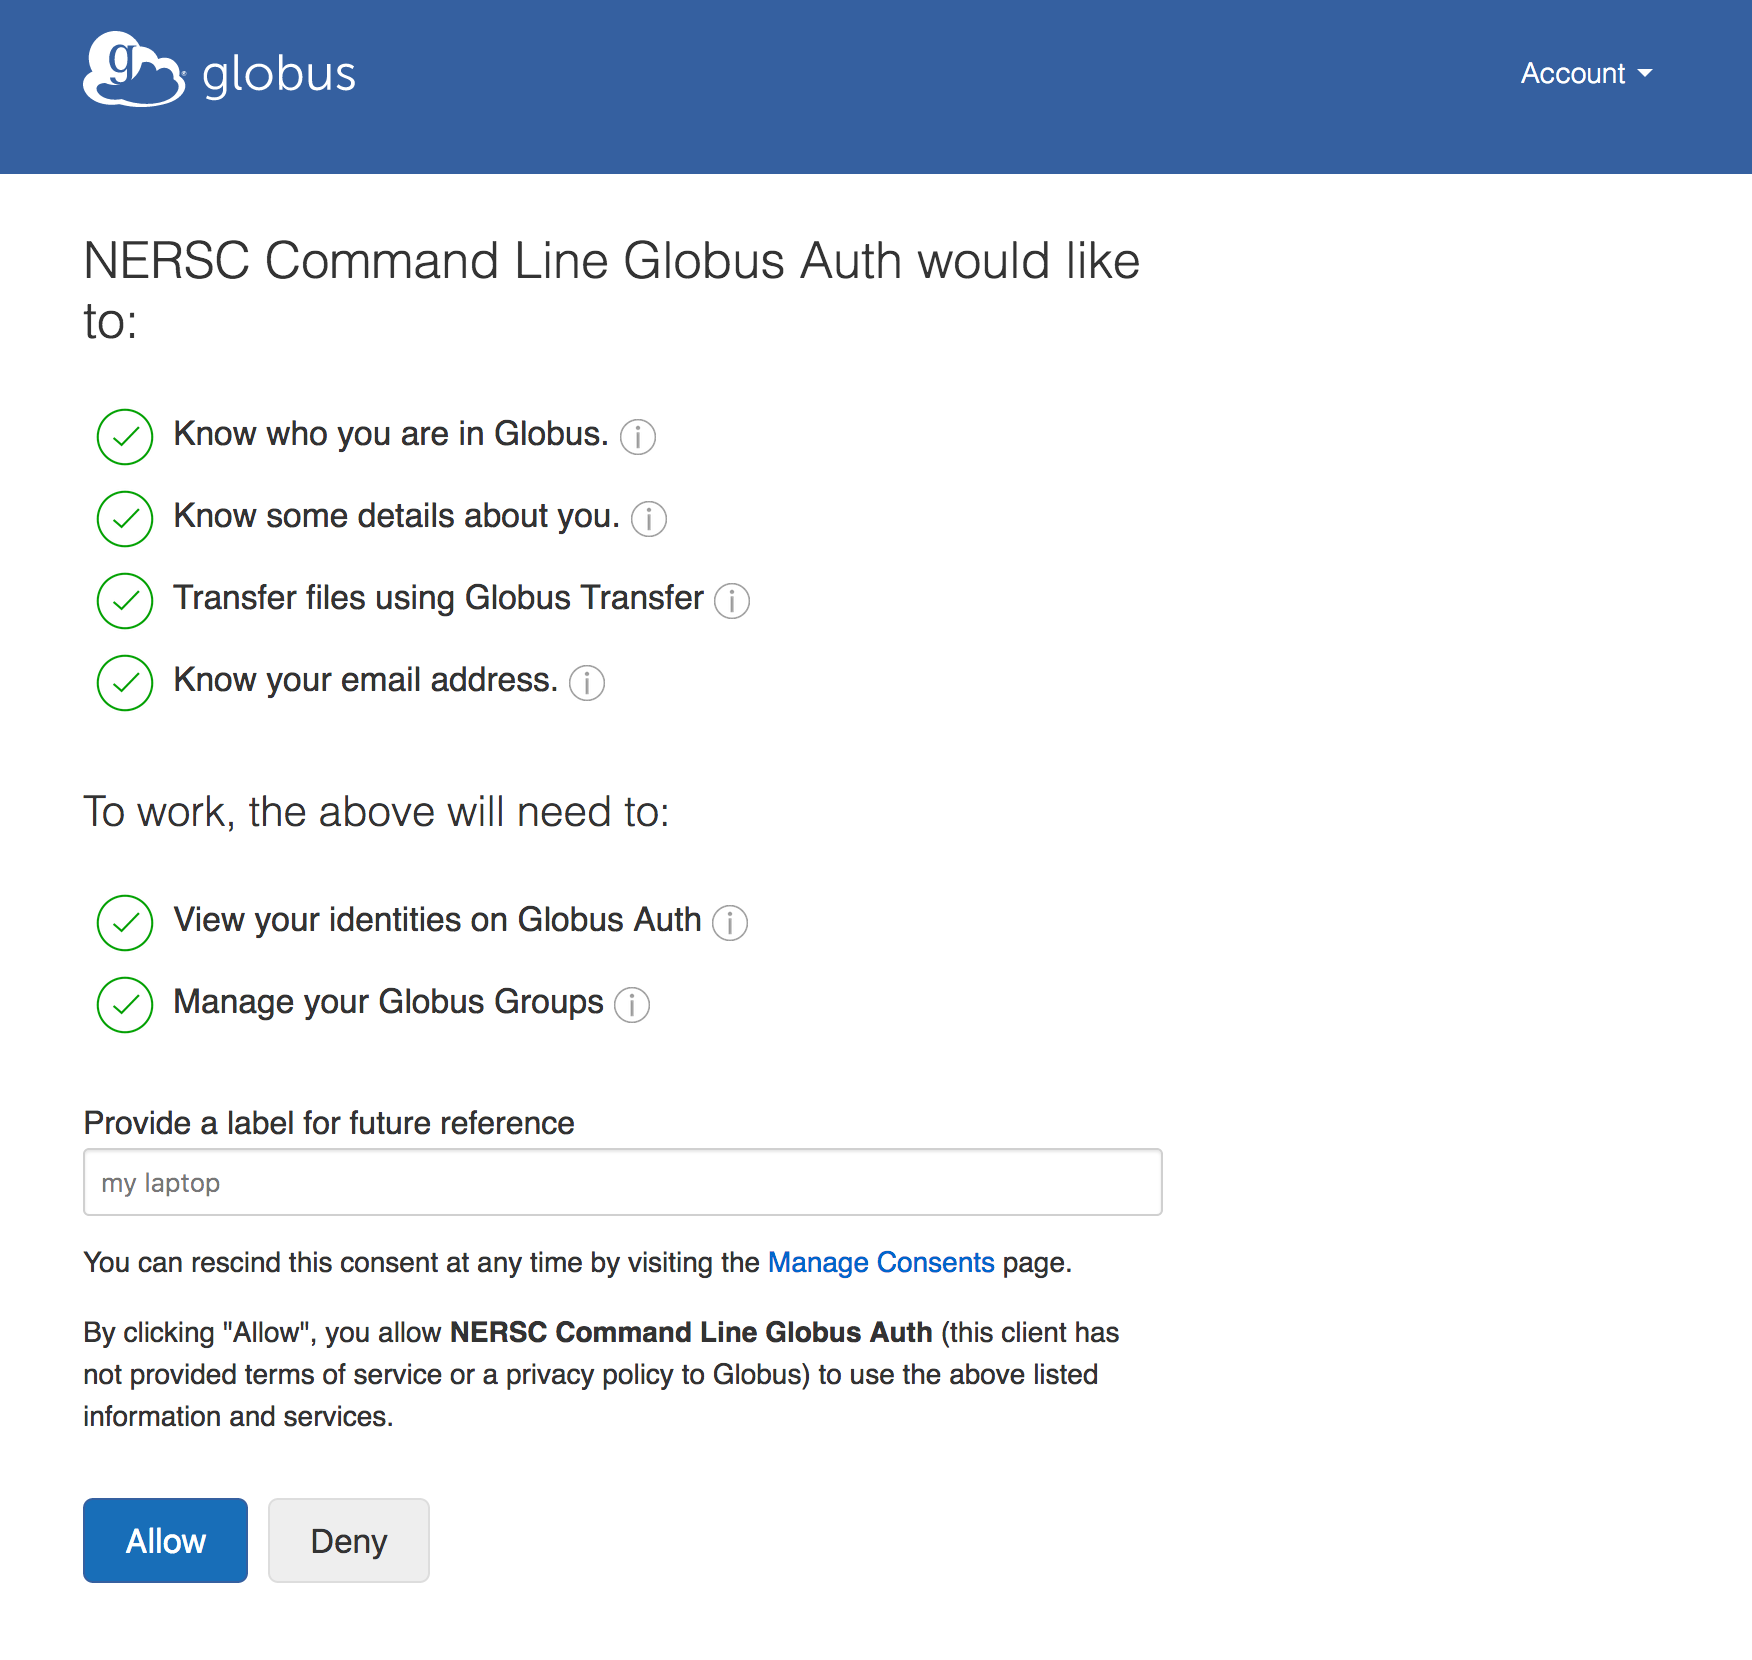
The first time you run any of these scripts, it will generate and store a Globus token in your NERSC home directory. It does this by creating a one-time Globus web page for you grant permission to generate this token. Paste this web page address into a browser and it will take you to a page where you can grant the native Globus application permission to make transfers on your behalf and check on the status of your transfers. You may get a prompt to log in to Globus first if you don't already have an active session. Once you click "Allow" it will generate a one-time code. Paste this code back into the terminal at the prompt and push return. It will use this to generate a token that can be used for this and future Globus interactions on your behalf.
Danger
Do not share this Globus token with anyone else. This is the same as sharing your NERSC password and is against NERSC policy.
Globus CLI
Globus has a Command Line Interface (CLI) that provides access to some to Globus services from the shell, and is suited to both interactive and simple scripting use cases. You can access this at NERSC by doing module load globus-tools. See the Globus CLI page for examples of how to use it.
Globus S3 Endpoint
NERSC has an experimental Globus S3 endpoint that can be used to access and share content from AWS S3. When accessing the collection for the first time you will be prompted to add AWS IAM credentials which will be found on your AWS account page. Then any bucket the credentials have access to will be available to transfer through the Globus web UI and Globus API.
Using Globus with Collaboration Accounts
Collaboration accounts are used by groups to manage large sets of data or software. At the request of the PI or PI Proxy, NERSC can set up a dedicated Globus endpoint that will allow data transfers via Globus as the collaboration account. This is a valuable tool for groups that need to make large data transfers into or out of NERSC and would like the data to be owned by the collaboration account. Only NERSC users who could already become the collaboration account are able to access these endpoints. You must also have a Globus account that is linked to your NERSC account. We will need permission to set up an endpoint from the collaboration account's PI or PI Proxy as well. If you are interested in getting a Globus endpoint for your collaboration account, please open a ticket and we'll work with you to set one up.
Troubleshooting
Connection Errors Between NERSC and other endpoint
If you are getting errors that you cannot connect to the NERSC endpoint after you've activated it, please check with your system administrator that they are not blocking the IP of the NERSC host (you can find this information in the error message of the Activity pane on the globus web page). If they are not, please open a ticket with the IP address of the other endpoint and we will investigate further.
Trouble Activating a NERSC Endpoint
If you are having trouble activating a NERSC endpoint, please try logging into Iris to clear your authentication failures. If that still doesn't fix the issue, please open a ticket with the error and we'll investigate further.
Dealing with Links
Be aware that Globus will follow hard links and copy the data to the target directory. Depending on the way the directory or file is transferred, it will also follow soft links. You can find details on Globus' FAQ page