Snakemake
Snakemake is an open-source tool that allows users to describe complex workflows with a hybrid of Python and shell scripting. Snakemake will automatically determine how to structure the workflow based on the input/output files specified for each job step (which Snakemake calls a rule).
Snakemake has been developed for and is most heavily used by the bioscience community, but there is nothing about the tool itself that cannot be easily expanded to any type of scientific workflow. If you'd like to see examples of how people are using Snakemake, see the Snakemake workflows GitHub repository.
Strengths of Snakemake
- Suitable for complex jobs and dependency structures, including wildcards
- Built-in methods to visualize task graph
- Can run tasks in parallel
- Built-in methods to keep track of finished and pending tasks
- Easy on Slurm (when the Slurm executor plugin is not used)
Disadvantages of Snakemake
- Snakemake is complex and requires time to learn
- Works in two modes: single node or cluster mode, although cluster mode is not a good fit for NERSC. We strongly suggest that Snakemake be used for single node jobs. Users who need multinode jobs should use another tool such as Parsl, Taskfarmer, or Fireworks.
Slurm executor plugin not suitable for NERSC
Astute readers of the Snakemake docs will find that Snakemake has a Slurm executor plugin. However, this means that Snakemake will treat each rule as a separate job and submit many requests to Slurm. We don't recommend this for Snakemake users at NERSC. 1) Submitting each rule as a separate job means that a Snakemake workflow may take a long time to complete and 2) submitting many jobs to Slurm will degrade scheduler performance for everyone. One of the main advantages of workflow tools is that they can often work independently of a job scheduler, so we strongly encourage single node Snakeflow jobs that will run without burdening Slurm.
Learning to use Snakemake
The Snakemake docs have an excellent tutorial that we won't reproduce here. We do however highly recommend that you work through the tutorial. Snakemake is a relatively complex tool with a lot of different capabilities; the tutorial will give you a helpful snapshot.
Note that to run the tutorial, you will need to create a custom conda environment called snakemake-tutorial as they specify. Note that you don't need to install miniconda-- you can just module load python and build your custom tutorial environment on top of our default Python. You can delete your snakemake-tutorial environment when you're done with the tutorial.
Using the CLI
How to write Snakemake rules
How to use Snakemake at NERSC
To use Snakemake at NERSC you'll need to build a custom environment. The Snakemake developers recommend Mamba instead of conda (which struggles with Snakemake) so we'll follow their recommendation.
Building an environment containing Snakemake
Using mamba from the python module, we can build our Snakemake environment:
module load python
mamba create -c conda-forge -c bioconda -n snakemakeenv snakemake
source activate snakemakeenv
Now our snakemakeenv environment is ready to use.
A NERSC Snakemake parallel example
Assuming you have built your snakemakeenv custom conda environment and worked through the tutorial, you are now ready to start using Snakemake at NERSC. Because you are running at NERSC you are presumably interested in running your workflow in parallel, so we will focus on this use case.
Key points for running Snakemake rules in parallel:
- Snakemake has a
--coresargument. To fully use all of the resources on Perlmutter, setcores=128for a CPU node. - Snakemake rules have a
threadsargument. By default this is 1 which is not ideal for a place like NERSC with many cores per CPU. It is therefore important to remember to setthreadsto a value greater than 1 to avoid wasting cores. Note that if you request more threads than available cores, Snakemake will usethreads=min(threads,cores) - For more information about
coresandthreads, see the Snakemake advanced uage documentation.
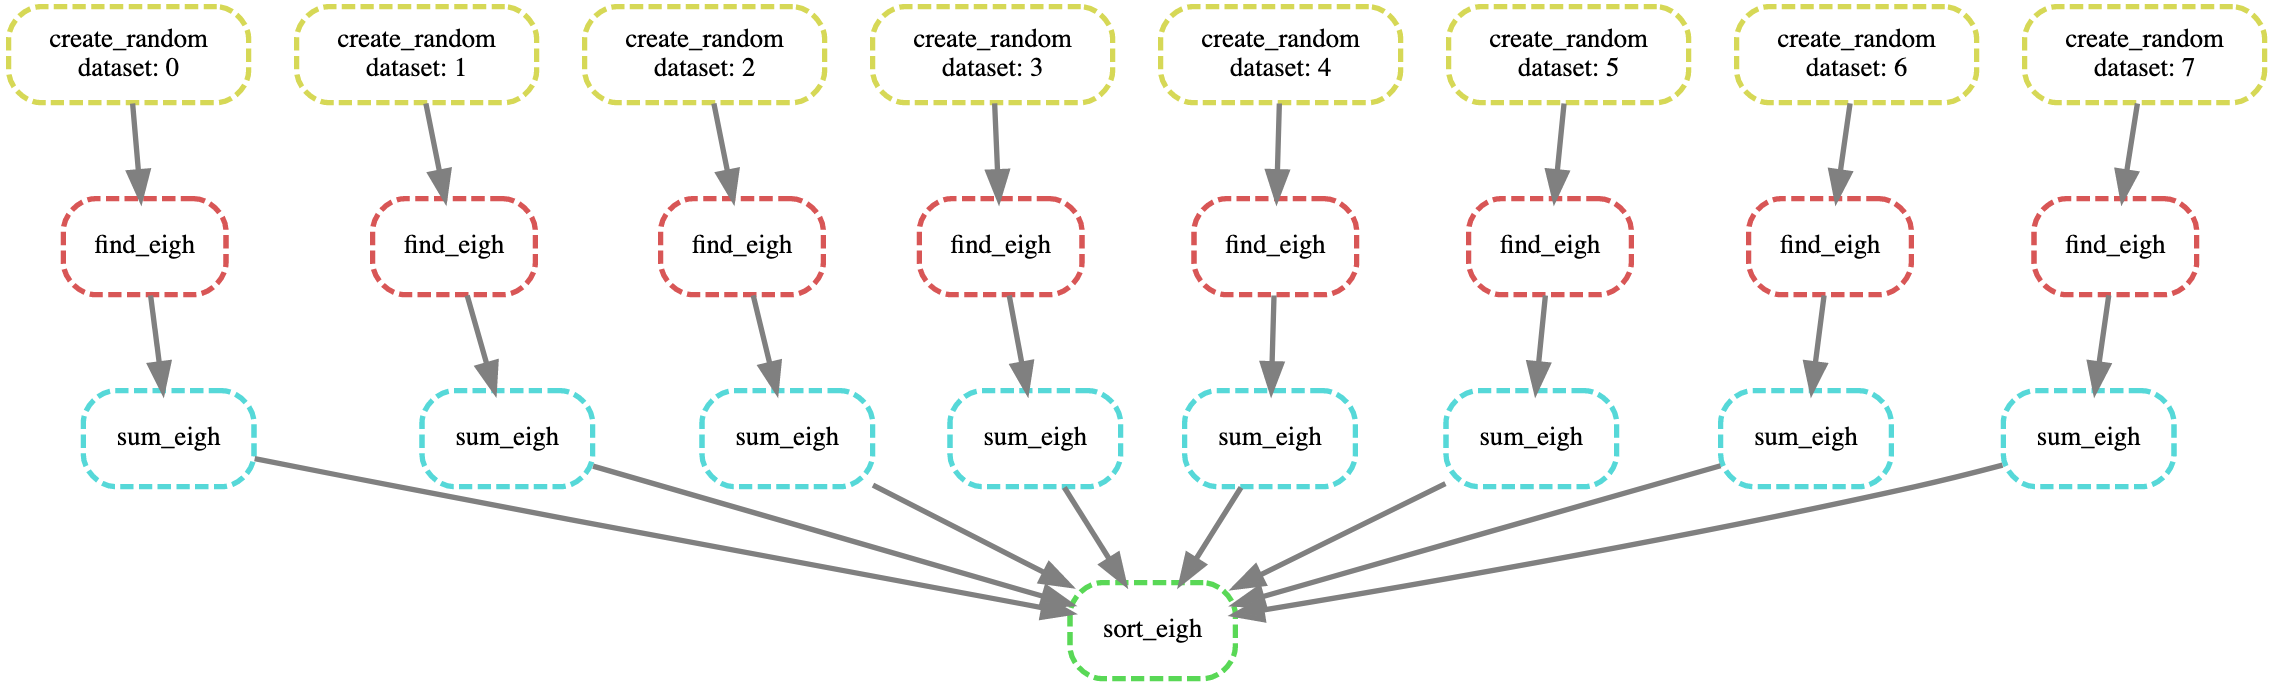
In our example Snakemake workflow, we:
- Create 2D matrix of random numbers and store as 8 distinct NumPy files
- Find the eigenvalues and eigenvectors of these 8 random matrices
- Find the sum of the eigenvalues for each file
- Sort the sums of our 8 tasks and print the output
Passing arguments into Python scripts is non-standard
Note that passing arguments into your script is tricky. It is easiest (and cleanest) to use the the global snakemake.input and snakemake.output objects. This is actually one of the nicer features in Snakemake because it means that the user doesn't have to write an argparse or do other bookkeeping kinds of tasks to keep track of the filename. See this example for more information.
Our example Snakefile:
DATASETS = "0 1 2 3 4 5 6 7".split()

rule create_random:
    input:
    output:
        "data/random-data-{dataset}.npy"
    threads: 4
    script:
        "scripts/create-random.py"

rule find_eigh:
    input:
        "data/random-data-{dataset}.npy"
    output:
        "data/eigh-output-{dataset}.npy"
    threads: 16
    script:
        "scripts/find-eigh.py"

rule sum_eigh:
    input:
        "data/eigh-output-{dataset}.npy"
    output:
        "data/sum-eigh-{dataset}.npy"
    threads: 4
    script:
        "scripts/sum-eigh.py"

rule sort_eigh:
    input:
        expand("data/sum-eigh-{dataset}.npy", dataset=DATASETS)
    output:
        "output/sort-output.txt"
    threads: 8
    script:
        "scripts/sort-eigh.py"
Here are the scripts required by our Snakefile:
create-random.py
import numpy as np

n = 8
size = 1000

for i in range(n):
    random_data = np.random.random((size,size))
    savename = snakemake.output[0]
    np.save(savename, random_data)
find-eigh.py
import numpy as np

filename = snakemake.input[0]

random_data = np.load(filename)
eigh_values, _ = np.linalg.eigh(random_data)

savename = snakemake.output[0]
np.save(savename, eigh_values)
sum-eigh.py
import numpy as np

filename = snakemake.input[0]

eigh_data = np.load(filename)
eigh_sum = eigh_data.sum(axis=0).sum()

savename = snakemake.output[0]
np.save(savename, eigh_sum)
sort-eigh.py
import numpy as np

filenames = snakemake.input

sum_all = np.zeros(len(filenames))

for i,filename in enumerate(filenames):
    sum_all[i] =  np.load(filename)
    sum_sort = np.sort(sum_all)

with open(snakemake.output[0], "w") as tf:
    tf.write(str(sum_sort))
We will now run our example Snakefile (and hence, our Snakemake-based workflow) on a compute node. You can request a compute node either interactively or submit your Snakemake workflow via a batch job.
On our compute node, we must source our snakemakeenv:
module load python
source activate snakemakeenv
One of the nicest things about Snakemake is that it will determine the structure of your workflow for you. All you have to do is specify your target file and it will work backwards. In this case output/sort-output.txt is the final file we need, so this is the target file we specify.
When we run Snakemake, we will specify --cores 128 to ensure it uses the whole CPU node:
snakemake -n --cores 128 output/sort-output.txt
Including the -n will show us the dry run and
snakemake --cores 128 output/sort-output.txt
will run our entire Snakemake workflow.
snakemake --cores 128 --forceall output/sort-output.txt
The --forceall flag will force our entire Snakemake workflow to re-run. By default if Snakemake detects a file is already present, it will not re-run the rule to produce this file.
To visualize the DAG of our workflow we can run
snakemake --dag output/sort-output.txt | dot -Tsvg > dag.svg
and view the dag.svg file we created in any internet browser. (You'll probably want to scp it back to your local machine to view it.)
Visualizing the DAG is a good sanity check that your Snakemake workflow looks the way you intend.
Here is the dag.svg which is consistent with what we expect: